12. uWebSocketIO Starter Guide
uWebSocketIO Starter Guide
This project involve using an open source package called uWebSocketIO . This package facilitates the same connection between the simulator and code that was used in the Term 1 Behavioral Cloning Project, but now with C++. The package does this by setting up a web socket server connection from the C++ program to the simulator, which acts as the host. In the project repository there are two scripts for installing uWebSocketIO - one for Linux and the other for macOS.
Note: Only uWebSocketIO branch e94b6e1 , which the scripts reference, is compatible with the package installation.
Linux Installation:
From the project repository directory run the script:
install-ubuntu.sh
Mac Installation:
From the project repository directory run the script:
install-mac.sh
Some users report needing to use
cmakepatch.txt
which is automatically referenced and is also located in the project repository directory.
Windows Installation
Although it is possible to install uWebSocketIO to native Windows, the process is quite involved. Instead, you can use one of several Linux-like environments on Windows to install and run the package.
Bash on Windows
One of the newest features to Windows 10 users is an Ubuntu Bash environment that works great and is easy to setup and use. Here is a nice step by step guide for setting up the utility.
We recommend using the newest version of Ubunut Bash 16.04, which is able to run the
install-ubuntu.sh
script without complications. The link
here
can help you check which version of Ubuntu Bash you are running, and also help you upgrade if you need to.
Docker
If you don't want to use Bash on Windows, or you don't have Windows 10, then you can use a virtual machine to run a Docker image that already contains all the project dependencies.
First install Docker Toolbox for Windows .
Next, launch the Docker Quickstart Terminal. The default Linux virtual environment should load up. You can test that Docker is setup correctly by running
docker version
and
docker ps
.
You can enter a Docker image that has all the project dependencies by running:
docker run -it -p 4567:4567 -v 'pwd':/work udacity/controls_kit:latest
Once inside Docker you can clone over the GitHub project repositories and run the project from there.
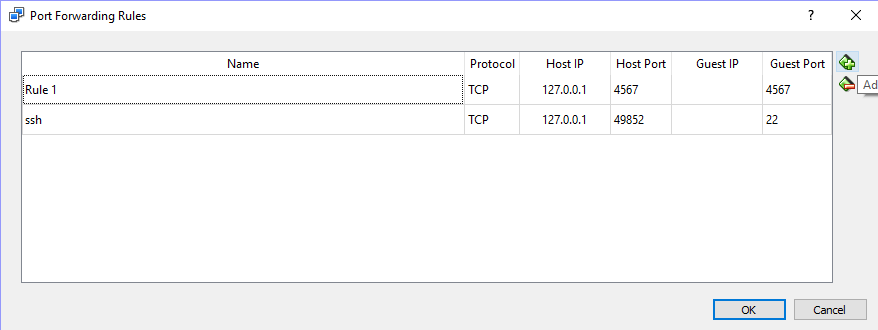
Port forwarding is required when running code on VM and simulator on host
For security reasons, the VM does not automatically open port forwarding, so you need to manually enable port 4567 . This is needed for the C++ program to successfully connect to the host simulator.
Port Forwarding Instructions
- First open up Oracle VM VirtualBox
- Click on the default session and select settings.
- Click on Network, and then Advanced.
- Click on Port Forwarding
- Click on the green plus, adds new port forwarding rule.
- Add a rule that assigns 4567 as both the host port and guest Port, as in the screenshot.
